
If you got stuck playing Rooms & Exits Level 10 Chapter 2 – Restaurant, don’t worry – it happens! And today I am here to help you beat this level by sharing the complete text walkthrough below.
So if none of the in-game hints help anymore, use this text walkthrough without worries. I hope you appreciate text walkthroughs as much as I do – they don’t give you spoilers for the full game, just the part you’re stuck with!
Or, if you want, you can use my Rooms & Exits Restaurant walkthrough to complete the entire level. Let’s jump right in!
1. Tap and get the Fruit Basket on the bar. Tap the plant display on the wall, next to the frame with changing colors and get Chili pepper from the top flower pot, the Bay leaf from the bottom one, and the Handle next to the wine bottles.
2. Go back and take the Flowers from the bottom right table, Sausage from a plate on the table above, Olives from the table by the window, and a Piece of Paper from the glass on the middle table.
3. Tap the leftmost shelves above the bottles and get the chocolate from the plate. Also note the order of the glasses at the back.
4. Look at the photo frame with changing colors – you will see that each cocktail has a price under it. Combine that with the order of the glasses and you get the code to open the briefcase near the chair of the middle top table (6743). Get the piece of paper.
5. Tap the table with many plates on it to zoom in. Count the plates and forks – 8 (two plates sit on other plates) and 5, so 13 total. Also count them on the table by the window – 4 plates and 1 fork. In total, we have 18.
6. Tap the small photo frames by the door to the right and add the three pieces of paper there. Now, arrange them from the smallest seed on top to the largest at the bottom:
- sunflower seeds
- pumpkin seeds
- nuts
- walnuts
- coconut
Tap the slot that opens and use the number of plates and forks we’ve counted above (18) to open it. Get the key.
7. Tap the ice cream stand and open your inventory. Dismantle the Flowers to get the piece of paper, and also dismantle the Fruit basket to get various fruits. Place them on the ice creams to match:
- left one – orange
- red one – strawberry
- green one – kiwi
- brown one – chocolate
- right one – banana
A drawer opens – take the piece of paper and oven button.
8. Use the door in your inventory to open the door to the right and enter the room. Tap the window and use the handle in your inventory to open it.
9. Now, let’s collect some items! Open the drawer on the bottom of the cupboard to the right of the door and get a Lid. Open the drawer under the stove and get the Grater. From the shelf under the glasses, get the Dough. Finally, get the Ladder that sits partially hidden behind the area where you got the dough from.
10. Tap the fridge and use the piece of paper from your inventory to open it (tap the colored handles until they match the photo):
- 4 purple to the left, 2 purple to the right
- 1 large orange to the left, 3 orange to the right
Get the onion and chicken drumstick.
11. Tap the bread box on the counter by the door and solve the puzzle: place the eggs on toast in the bottom corner, then work from there with the rest of the image. It won’t fill the entire puzzle board – just focus on matching the pieces, domino-style.
After completing it, get the food scoop.
12. Go to the other room and zoom into the largest flower pot on the left side of the screen. Use the food scoop to get a Carrot. Also, place the ladder by the shelves near the door and take the Pot from the top area.
13. Tap the wall by the main door to see the medal rack. Remember the order of the food items!
14. Go back to the other room and tap the image to the left of the window and solve the puzzle there (the soup bowl is in the middle and lentil bowl on top). Use the order of the foods from the medal:
- top row: Pie, Loaf of Bread, Chef’s hat, Pan
- bottom row: Bread, Cutlery, Chef’s hat
Get the Tomato.
15. Tap the double door fridge and open it using the position of the fish on the plates in the room next door: left, up, down, left. Get the Food Container and dismantle it in your inventory to get Cheese, then combine it with the grater to get Grated Cheese.
16. If you look at the piece of paper by the sink, you will see recipes for soup and pizza. We have to prepare those now!
17. Tap the oven and use the oven button from your inventory in the missing spot. Open the door and, in your inventory, prepare the pizza (you must respect this order): combine the dough with the tomato, then with the Sausage, Chili pepper, Cheese and olives.
Place it in the oven and turn it on to see two letters: AS.
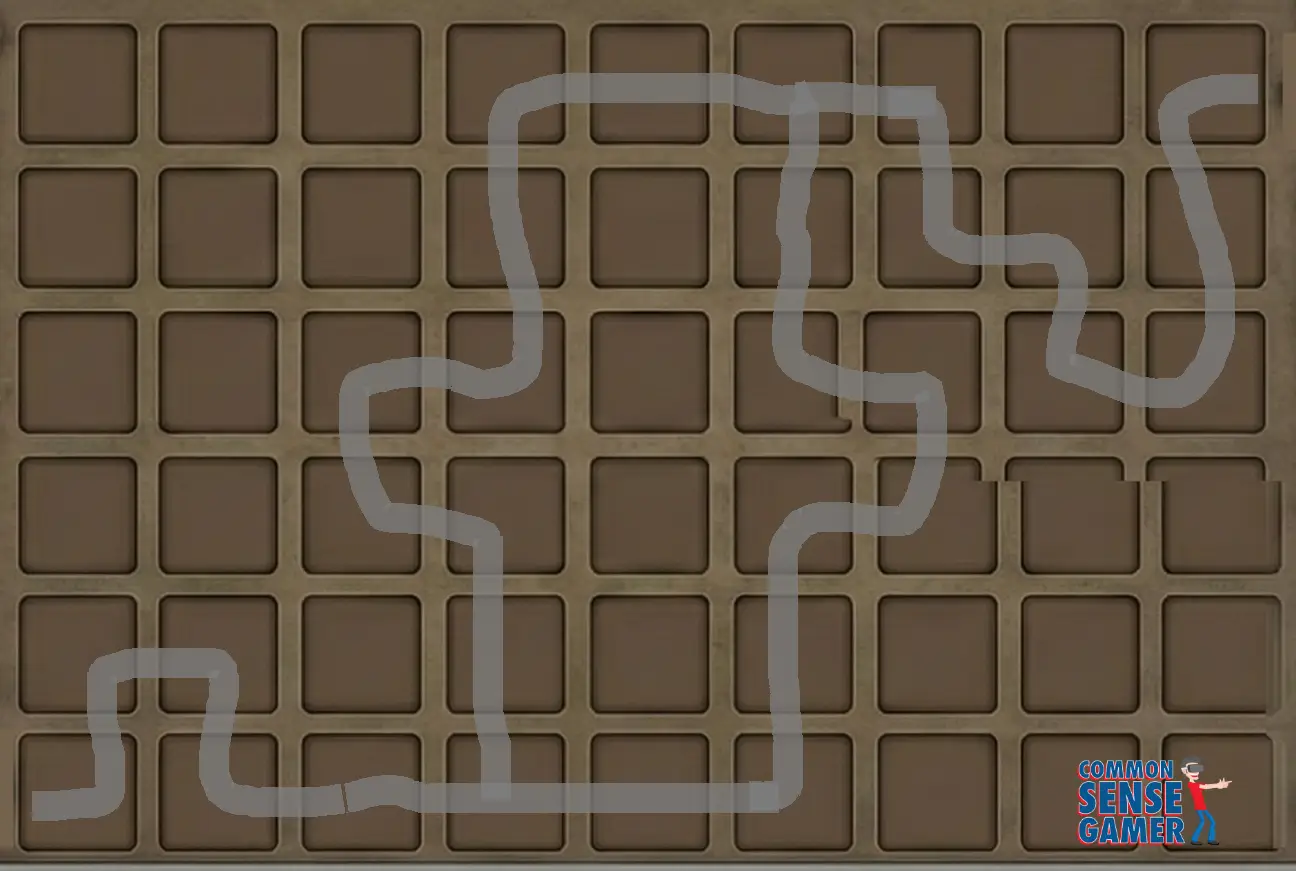
18. Tap the cabinet under the sink and solve the puzzle there, connecting the pipes, but making sure everything is connected (no open ends). You will end up with something that looks like this:
19. Tap the sink and fill the pot from your inventory. Pick it up and place it on the stove, then add the ingredients in this order: onion, carrots, chicken drumstick, bay leaves and lid.
20. Tap the dials on the stove and set the left one to 7, and the right one to 45 (you get these if you look at the photo of the bowl of soup in the puzzle we solved by the window). When all is correct, you will see the letters YZ on the lid.
21. Go back to the main door and use the correct code to exit (YZAS).
This is it! You have completed the level – it was a very hard one, but it’s over now! You can now challenge yourself by playin the next one or any of the previous levels, listed below:
- Rooms & Exits Chapter 2 Level 5: Gym Walkthrough
- Rooms & Exits Chapter 2 Level 6: Candy Shop Walkthrough
- Rooms & Exits Chapter 2 Level 7: Food Court Walkthrough
- Rooms & Exits Chapter 2 Level 8: Pet Shop Walkthrough
- Rooms & Exits Chapter 2 Level 9: Indoor Playground Walkthrough
If you still have questions about the Restaurant Level, let me know by posting a comment below, and I will help ASAP. Don’t forget – I have a full Rooms & Exits walkthrough hub here, ready to help if you get stuck again.

- Re Rangers X Tier List (Formerly Anime Rangers X) - July 7, 2026
- Star Sailors Tier List: All Battle & Assist Partners Ranked - July 7, 2026
- Star Savior Tier List (Post-Carnelia Update) - July 7, 2026