If you are stuck playing Level 5 Chapter 2 in Rooms & Exits – Gym, worry no more! I am here to share the full text walkthrough for this level and help you beat it if none of the hints can.
Text walkthroughs like this one are great if you don’t want spoilers and only care about the part you’re stuck with, and I am sure that today’s Rooms & Exits Gym walkthrough will come in handy. So without further ado, let’s jump in and see how to finish this level!
1. Look at the poster on the wall and count the amount of each symbols (squares, triangles, circles). We will use the result to open the locker #2.
Answer: 165.
Pick up the pedal part.
2. Look at the numbers on the mat: 8, 6, 0, 9. For some reason, this exact number doesn’t work as a code for Locker #1, but I tried variations of it and one worked: 6098. Get the Mat from the locker.
3. In your inventory, dismantle the Mat and get the Pedal Part. Combine it with the other Pedal Part and get the Pedal.
4. Tap the bike and place the pedal on it. Then start rolling it until you feel the green meter (and the bike’s screen lights up).
5. Go back and look at the weights near the door, and count how many of each color are there. Then, tap the bike’s screen and use the resulting number as the code (3516).
6. The screen will show you a set of arrows. We’ll need to use those for the next puzzle. I will tell you the exact order in my case, but if it’s not the same in yours, simply write yours down.
7. Tap the treadmill next to the bike and press the arrows in this order: up, up, up, down, left, left, down, up. Look at the shapes of the women dressed in red – we’ll need them to to open the next locker!
8. Tap Locker #3 and tap the symbols until they match the poses from the treadmill (the one looking like a T, A, V). Get the key.
9. Go back and take the Valve Handle from the weight rack under the poster. Then use the key to open the shower room and get inside.
10. Place the Valve handle on the pipe near the showers to shut them off. Then, tap the right shower and get the keys.
11. Go back to locker #4, tap the door to zoom in and use the keys on the puzzle board. You need to perfectly fit them all in, as seen in the screenshot below:
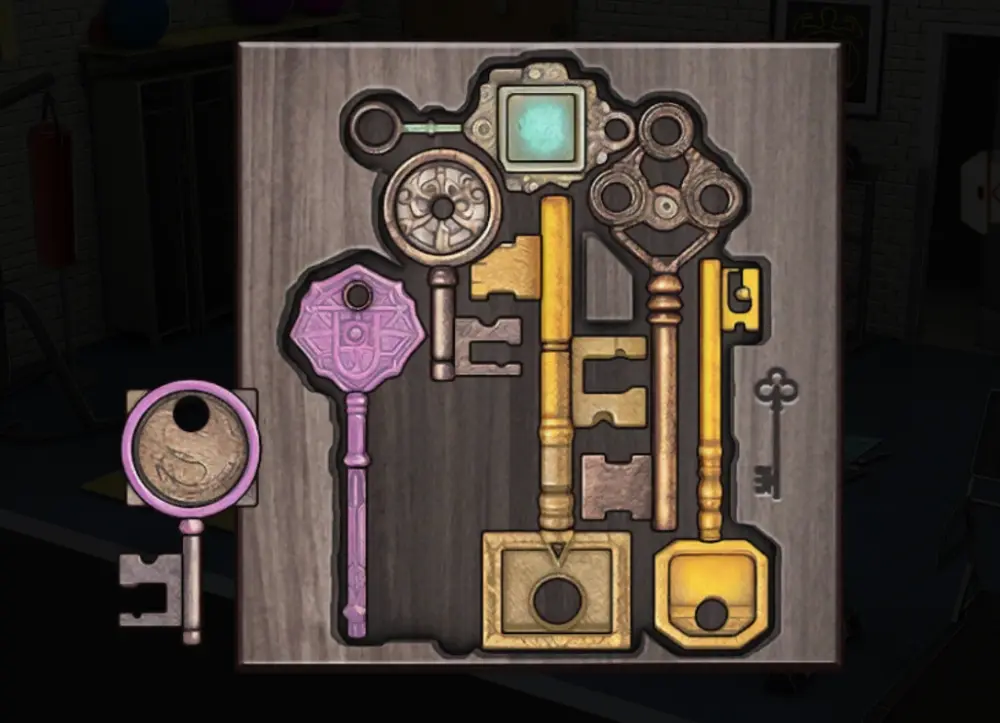
When the door opens, get the ladder.
12. Use the ladder on the lockers and tap the blue ball until it falls. Get the Glove, then use it on the Punch bag and get the Bag of chalk.
13. Tap the climbing board and use the chalk on it. It reveals the knobs and their colors (from up to down)
14. Finally, tap the “Exit” door and tap the colored buttons to match the ones from the climbing board: gray, gray, black, gray, black, black.
That’s all for this level! You have completed it, and you can now play the next one. Check all the levels in my Rooms & Exits Walkthrough Hub here.
Or, if you want, you can replay the previous ones with my help below:
- Rooms & Exits Chapter 1 Level 11: Lighthouse Walkthrough
- Rooms & Exits Chapter 2 Level 1: Cell Phone Store Walkthrough
- Rooms & Exits Chapter 2 Level 2: Cinemas Walkthrough
- Rooms & Exits Chapter 2 Level 3: Pharmacy Walkthrough
- Rooms & Exits Chapter 2 Level 4: Optical Store Walkthrough
If you still have questions about the Gym Level in Rooms & Exits, let me know by posting a comment, and I will gladly help. If not, make sure to check back soon for more text walkthroughs for this game.

- Re Rangers X Tier List (Formerly Anime Rangers X) - July 7, 2026
- Star Sailors Tier List: All Battle & Assist Partners Ranked - July 7, 2026
- Star Savior Tier List (Post-Carnelia Update) - July 7, 2026