
Did you get stuck playing the Living Room Level in Rooms & Exists – Murder Dressed in White (Chapter 3)?
Worry not – it happens to everyone, but I’m here to help! Today, I will share the full text walkthrough for this level so that you can complete it without any more headaches.
I recommend reading this walkthrough only if you are truly stuck (you’ve tried everything and the in-game hints don’t help) – the satisfaction of doing it yourself is greater. But sometimes, that just seems impossible, and if that’s the case, let’s check out the full Rooms & Exits Living Room Level 2 walkthrough below!
1. Draw all the window curtains all the way down and notice the smudges on them. If we consider a 3×3 grid, it would look like this (the X being a smudge)
- X-0-0
- 0-0-X
- 0-X-X
2. Tap the small wooden box on the shelf at the left of the fireplace. Using the hint from the window curtains above, we will solve the puzzle by moving the darker wooden pieces into the X-marked spots.
After you do that, get the key.
3. Tap the photo of the couple (in the same area) and notice the dots there. They are on lines in various directions – memorize the directions and the number of dots, as we’ll use them on our next puzzle.
4. Tap the photos on the wall above the fireplace, then tap the top left one to reveal a box. This is where we will use the hint from the photo to open it. Just press the arrows to match the number of dots on the photo (from left to right):
- all 4 buttons
- 2 buttons
- 1 button
- 3 buttons
Get the Ring with numbers.
5. Get the Glass of water on the table. And since you’re there, tap all the pieces of paper to remove them until a clean one remains.
6. Tap the drawers on the dresser to the right of the fireplace and, from the bottom one, get the hammer.
7. Use the hammer on the fireplace’s glass, then pour water on the fire. Get a piece of charcoal.
8. Tap the area behind the wood pile to reveal a safe. Tap it to zoom in and place the Ring with numbers in the middle.
9. To solve this puzzle, look at the three black arrows – they show you the sequence for entering the combination. Let’s find these combinations first!
10. Go back and look at the bamboo plants to the right of the fireplace, especially their height.
11. Tap the black cupboard doors by the window and use the key to open them. You must arrange the bottles to match the height of the bamboo plants. Here’s a sketch to help you arrange them:
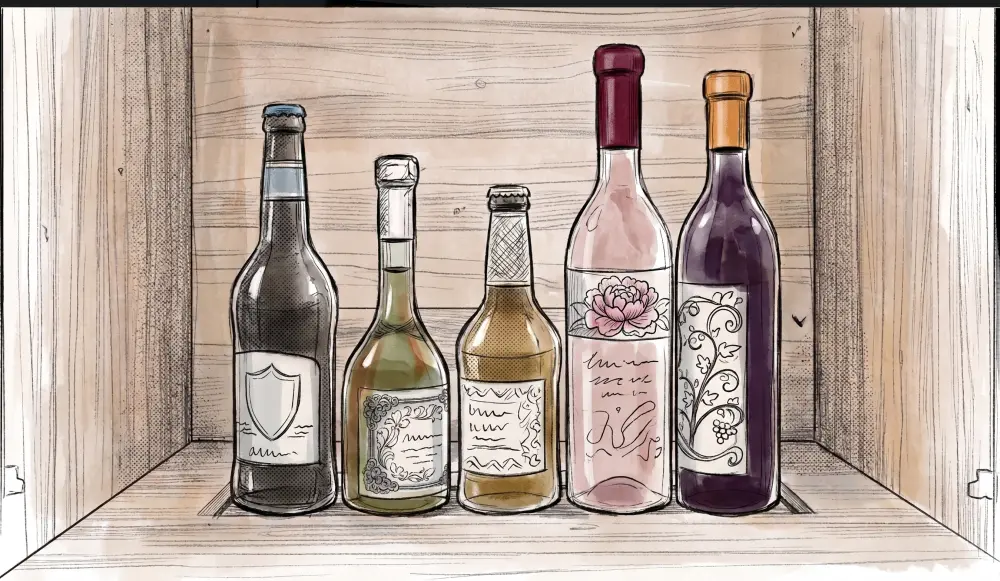
You will reveal a code, with a triangle pointing left: 73092 (third combination).
12. Tap the table and use the charcoal on it to reveal the second combination: 41270.
13. Tap the bookshelf, near the first box you opened when you started playing this level, and you will see the first combination on the red book: G27H9.
14. Now, go back to the safe in the fireplace and use the combinations in the correct order: first, use the white arrow keys to select the ring and move your finger to rotate it:
- By rotating each ring, starting with the largest one, enter the first combination under the triangle pointing up, and it will turn green (G27H9).
- Enter the second combination near the triangle pointing right, and it will turn green (41270).
- Finally, enter the third combination near the triangle pointing left, and it will turn green (73092).
Get the key and use it to open the door & exit.
Congratulations – you have now completed the level! It’s time for a new challenge in the Murder Dressed in White chapter, or replay any of the previous levels, like those listed below:
- Rooms & Exits Chapter 2 Level 23: Bakery Walkthrough
- Rooms & Exits Chapter 2 Level 24: Toy Store Walkthrough
- Rooms & Exits Chapter 2 Level 25: Restrooms Walkthrough
- Rooms & Exits Chapter 2 Level 26: Parking Walkthrough
- Rooms & Exits Chapter 3 Level 1: Dining Room Walkthrough
Also check out my Rooms & Exits walkthrough hub here, where I’m listing all the walkthrough articles for this game (published here on Common Sense Gamer).
If you still have questions bout this particular level, let me know and I will gladly help.

- Marvel Rivals Ranks in 2026: All Tiers, Rewards & Strategies - October 16, 2026
- Rooms & Exits Kitchen Walkthrough (Level 11, Chapter 3 – Murder Dressed in White) - October 15, 2026
- Rooms & Exits Garden Walkthrough (Level 10, Chapter 3 – Murder Dressed in White) - October 15, 2026