
If you need help with Level 9 – Backyard in Rooms & Exits, you’re in the right place! I am here today to help you with a full walkthrough for this challenging level in Chapter 3, Murder Dressed in White.
If you tried everything you could think of and you’re still stuck, read on – otherwise, I recommend trying to beat the level yourself, as the satisfaction is greater.
But sometimes, it’s way too difficult and a bit of help comes in handy. If that’s the case today, let’s jump into the full Rooms & Exits Backyard Level 9 walkthrough below!
1. Tap the green carpet by the pool and get the lighter.
2. Zoom in to the chair and get the tongs from the top of the pillow.
3. Zoom in on the box on the bench and place weights on each of the three sides, so they all get to the middle.
If we consider the leftmost weight – 1 and the rightmost 9, here’s how to place the weights:
- left: 9 – 5 – 1
- middle: 8 – 4 – 3
- right: 7 – 6 – 2
Get the steak.
4. Open the fridge next to the grill and get another steak.
5. From the basket near the fire, get a handle.
6. Tap the chimney area above the fire and collect all gears. You will get 8 in total: 4 from the corners and 4 from the middle area. Also open the doors and get another handle.
7. Tap the item near the pool and add the gears. You need to arrange them so they create a working mechanism.
If you can’t do it on your own, here’s a screenshot to help you (just move the top right small gear one step to the left):

Get the food box from the empty pool, then dismantle it in your inventory to get a steak.
8. Tap the pumpkin to zoom in, and tap it again to get a candle.
9. In your inventory, combine the candle and lighter to get a lit candle. Place it on the lantern hanging by the right column under the roof.
10. Tap the mat in front of the door and get another Handle.
11. Tap the fire area in front of the colored pillows and get one more handle.
12. Zoom in to the tool area and get the shovel.
13. Zoom in to the white bench and get the final handle from the pot to the right.
14. Go to the grill and place the handles on it. If you tap the table, you will see 5 grilled sausages – the lines on them show you how the handles on the grill should be positioned.
Here is the correct order, from left to right: \ \ – / –
15. After correctly setting the handles, tap the top side of the grill and place the steaks on it. Use the tongs in your inventory to turn them around – you will notice that each holds a symbol now.
16. Go back and look at the symbols under the pool. A letter corresponds to various symbols, and if you check the ones on the grilled steak, you will get the following letters: NSI.
17. Tap the open doors above the fire and use the code to open the box. Get the rolled paper and dismantle it in your inventory – it’s a treasure map!
18. Zoom in to the lounger again and use the shovel on the area between the log and the lounger. Get the telescope.
19. Place the telescope on the tripod by the fence (behind the table) and move each constellation until you get a major one that makes sense (with all the smaller ones connected) – it looks like a horse:
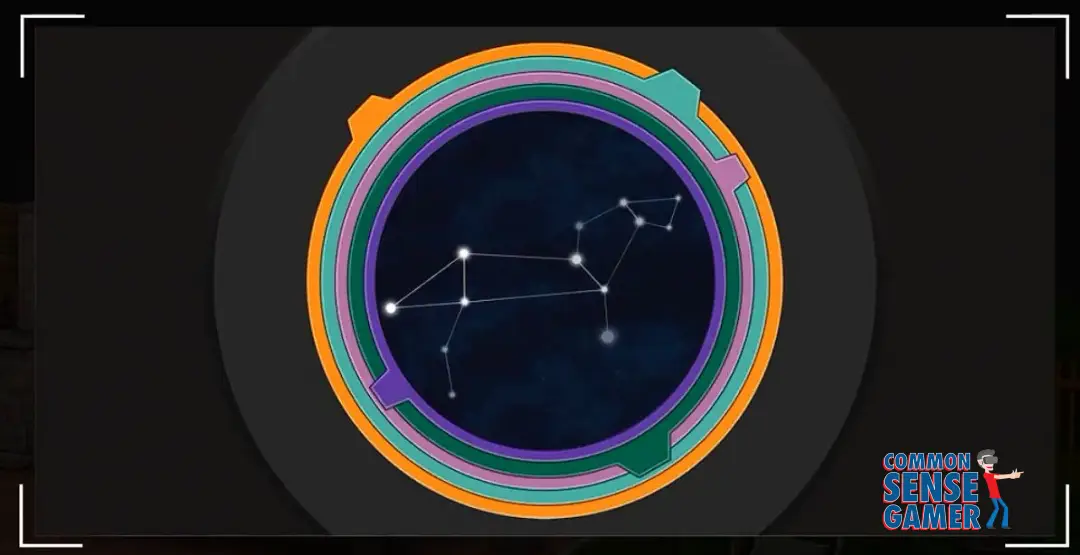
Count the number of stars in the constellation: we have 13 of them.
20. Tap the white bench by the door and enter the number on the stars. Get the two pillows.
21. Near the plant pots in the top right corner of the pool, there is a newspaper. If you zoom in, you will see some strange characters and some numbers written with green: 2-6-5-1-3.
22. Tap the pillows by the pool and the two in your inventory near the existing ones. Now, memorize the colors of the pillows based on the order you’ve seen in the newspaper.
The colors are: red, pink, orange, yellow, light green.
23. Tap the wreath on the door and arrange the fruits based on the colors: strawberry, raspberry, pumpkin, lemon, kiwi. The door opens, and you can exit.
This is it! The level is now completed and you’re ready for a new challenge in the game. If you need to revisit some of the older levels, I have the walkthroughs for them, too:
- Rooms & Exits Chapter 3 Level 4: Guest Toilet Walkthrough
- Rooms & Exits Chapter 3 Level 5: Workshop Walkthrough
- Rooms & Exits Chapter 3 Level 6: Guest Bedroom Walkthrough
- Rooms & Exits Chapter 3 Level 7: Master Bathroom Walkthrough
- Rooms & Exits Chapter 3 Level 8: Kids Playroom Walkthrough
Also, for more help with any other game level, check out my walkthrough hub for Rooms & Exits – I’m publishing links there to all walkthrough articles on this website.
If you still have questions about this particular level, let me know in the comments below, and I will gladly help.

- Rooms & Exits Backyard Walkthrough (Level 9, Chapter 3 – Murder Dressed in White) - October 12, 2026
- Rooms & Exits Kids Playroom Walkthrough (Level 8, Chapter 3 – Murder Dressed in White) - October 12, 2026
- Rooms & Exits Master Bathroom Walkthrough (Level 7, Chapter 3 – Murder Dressed in White) - October 12, 2026